Almost every press-on set we hear about failing did not fail because the glue was weak or the design was wrong. It failed because the nail was the wrong size. Sizing is the least glamorous part of press-ons and by far the most important, so here is the whole method, in millimetres, with the charts we use ourselves.
Before you read on
As an Amazon Associate I earn from qualifying purchases. Retailer links in this article are affiliate links and cost you nothing extra. We only link to tools we use or would genuinely buy. Full wording on our affiliate disclosure page.
Why ninety percent of press-on failures are sizing failures
When a set lifts at the side wall on day two, or a nail pops off while you are washing your hands, the instinct is to blame the glue. Most of the time it is not the glue. It is a nail that is a fraction too wide for the nail bed, so the edges never make full contact and a channel of air runs underneath. Water creeps into that channel, the bond weakens from the inside, and the nail leaves. A correctly sized nail with ordinary glue outlasts a badly sized nail with the best glue on the market, every single time.
There is a second, subtler failure that is also a sizing failure: a nail that is too narrow. That one feels fine for a day, then a side wall catches on something and peels up like a page. The fix for both is the same, and it takes five minutes at a kitchen table.
Measuring your nail beds in millimetres
You do not need anything special. A soft measuring tape is easiest, but a strip of paper and a pen work just as well.
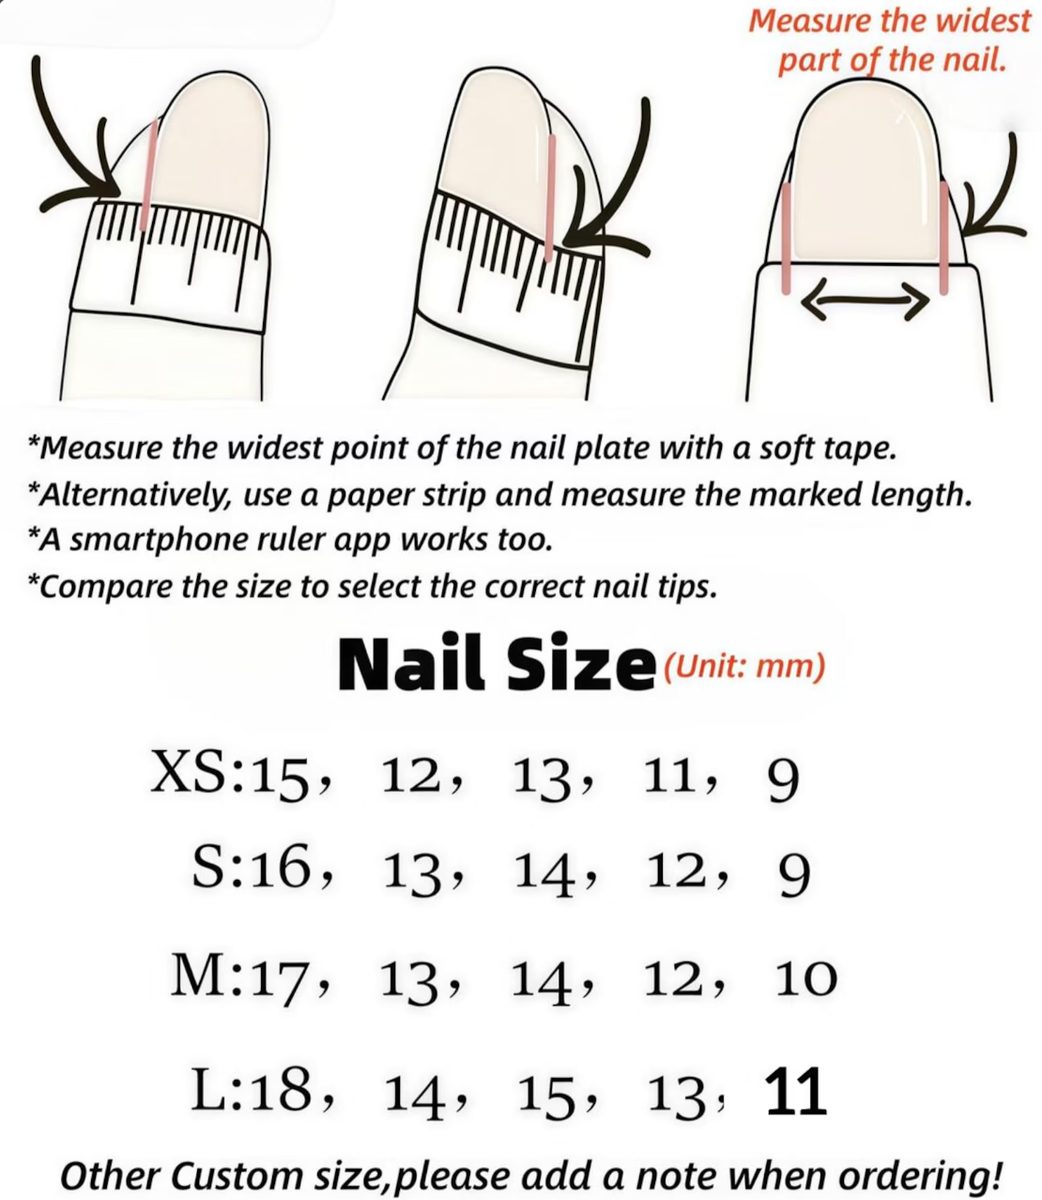
- Measure the widest point. Lay the tape across the nail bed, at its widest spot, which is usually just above the cuticle rather than at the tip. Read the width in millimetres. Do not round to the nearest five; two millimetres is the difference between a set that fits and one that does not.
- Measure all ten nails. Most people assume their hands are symmetrical. Most hands are not. A left thumb and a right thumb can differ by a millimetre or two, and that difference matters.
- Write the five widths down in the order thumb, index finger, middle finger, ring finger, pinky. Keep the paper. You will want it every time you order.
If you are using the paper method, wrap the strip across the nail so it follows the curve, mark where it meets itself, then lay the strip flat against a ruler. Following the curve matters; measuring the straight-line width of a curved nail underestimates it and you will order a set that is too small.
Reading a size chart properly
A size chart gives you five widths per size, one for each finger, measured in millimetres. Ours looks like this: an XS set runs 15, 12, 13, 11 and 9 millimetres from thumb to pinky. A small steps up to 16, 13, 14, 12 and 10. Medium adds another millimetre or so across the board, and large a little more again. The exact numbers do not matter as much as the shape of the row: the thumb is always the widest, the pinky the narrowest, and the middle finger is usually a shade wider than the index and ring.
Now match your own five numbers to the row that fits. The important thing is that you compare finger by finger, not as an average. A hand that is a medium on the thumb and a small on the pinky is completely normal, and a chart is designed to be read finger by finger for exactly that reason. If the size that fits your thumb leaves your pinky floating one millimetre wide, you are a mixed hand, and that is fine.
When you are between two sizes
Go up. Always up, never down. A nail that is one millimetre too wide can be filed down at the side walls until it fits, and that filing takes about ten seconds per nail with a fine file. A nail that is one millimetre too narrow cannot be fixed, because you cannot add material back. So when you are torn between two sizes, order the larger one and keep a fine file within reach.
Choosing a shape by lifestyle, not by mood
Shape is the other half of sizing, and it should be an honest decision about your week rather than a decision about a photo you liked.
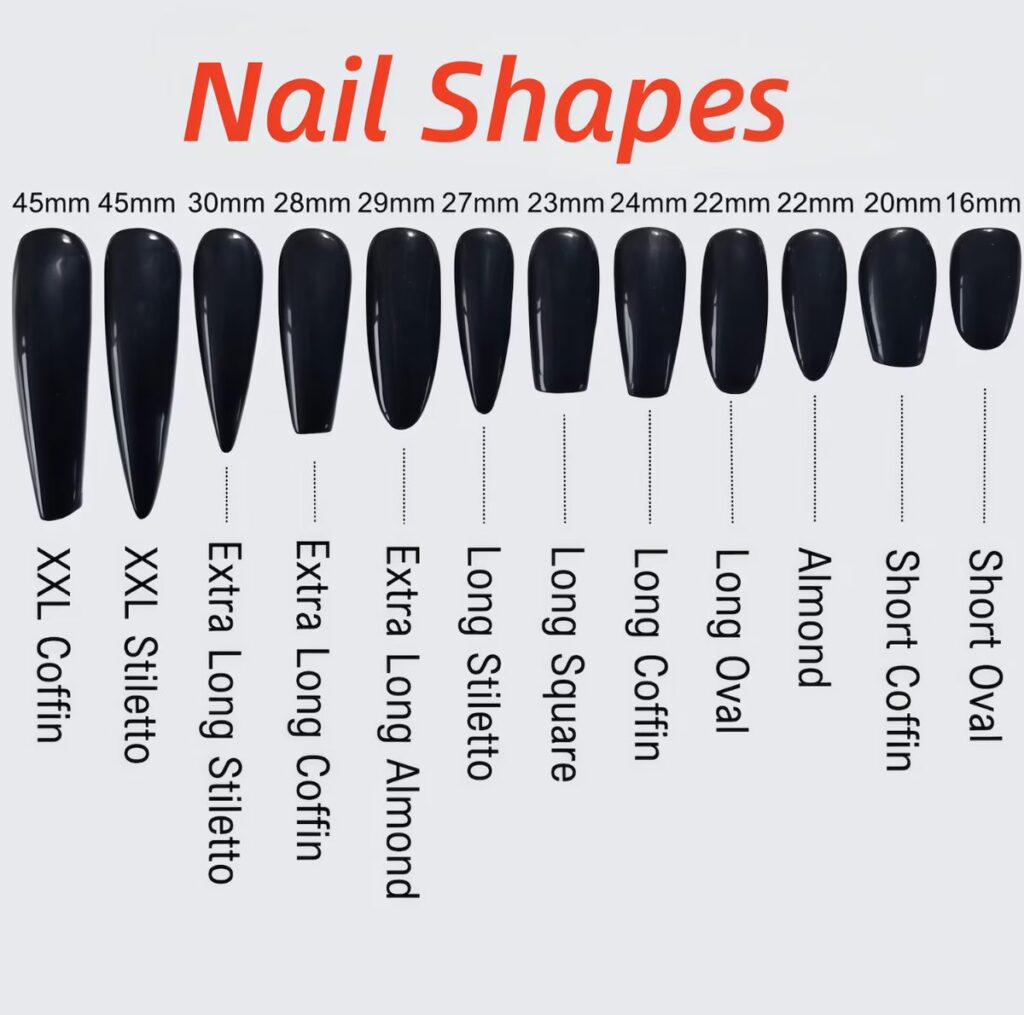
The length chart in our library runs from XXL coffin all the way down to short oval, and every step between those two changes how the set behaves. At the long end, an XXL coffin is a sculpture. It is beautiful on camera, it lengthens the hand dramatically, and it is genuinely impractical for typing, buttons and car keys. The small but real risk of any long, tapered shape is that the tip takes the impact in daily tasks instead of your fingertip, and tips snap.
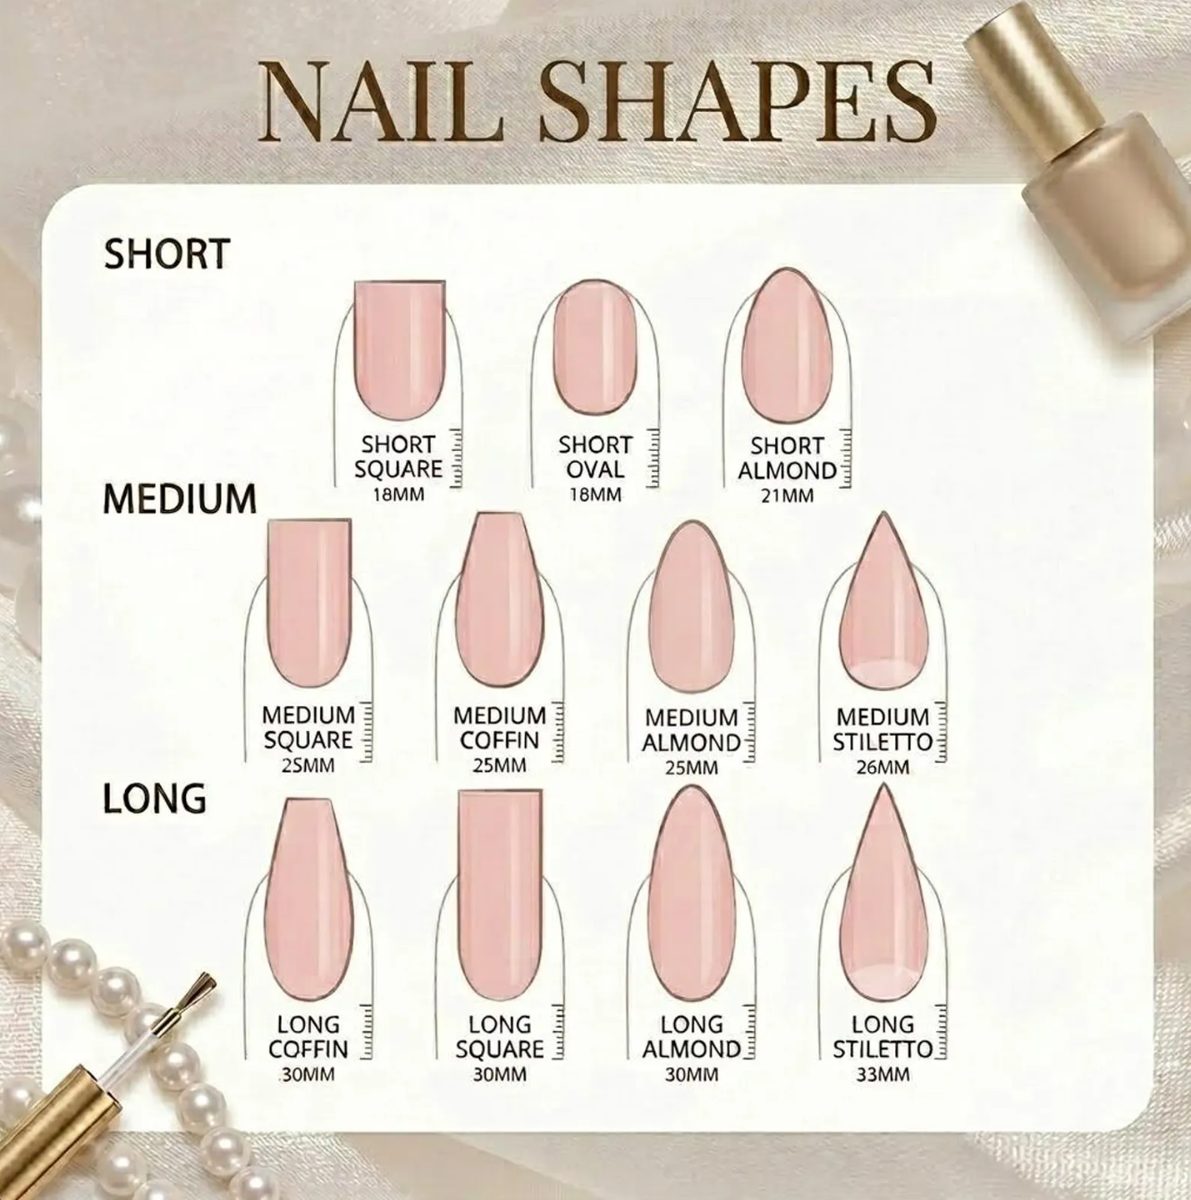
At the short end, a short oval or square barely changes your reach and lasts the longest, because there is no overhang to catch on anything. Everything in the middle, the almond and the medium coffin and the medium oval, is a compromise, and the compromise is usually worth it.
Our honest rule: if you type for a living or your hands are busy all day, choose short to medium and enjoy a set that lasts. If you want the drama, choose a longer shape for a specific occasion and accept that it is a weekend, not a month. There is no wrong answer here as long as you know which one you are picking.
Studio pick
A soft measuring tape. The one tool that makes sizing painless. A soft tape follows the curve of the nail instead of cutting across it, so the number you get is the number a chart expects. We keep one in every kit, and it costs so little that there is no reason to guess with a paper strip once you own one.
Sizing up and filing down
File the sides, not the tip, and work in one direction rather than sawing back and forth. Two or three light passes per side wall is usually enough to bring a nail down a millimetre. Check the fit after every pass, because it is very easy to take off one stroke too many, and once it is gone you are back to ordering. A fine-grit file gives a cleaner edge on a press-on than a coarse one, and a cleaner edge means less chance of a corner catching.
Studio pick
A set of fine nail files. For press-ons you want fine grit, not the coarse file you would use on a natural nail under a lamp. A fine file lets you remove a fraction of a millimetre at a time and gives the new edge a smooth finish, so a nail you sized down still looks like it was made that way. A pack in two or three grits covers both adjusting a press-on and shaping your own nail before you apply it.
Custom sizing, and when to ask for it
If your measurements do not map neatly onto any standard row, do not force them. Hands at the extremes, a very wide thumb with narrow fingers, for example, or a hand that is a large on three fingers and a small on the others, are exactly what custom sizing is for. Send us your five numbers and we cut the set to them. That is how the chocolate bow set in our autumn collection is made for most customers, because the bows need to land on the right nails for your hand, and the right nails are not always the middle three.
Whichever route you take, get the numbers onto paper before you order anything. Then read our wear-and-care routine, because a perfectly sized set with poor prep will still let you down, and a well-prepped set that is sized correctly is a genuinely three-week manicure.
Five minutes with a soft tape is the difference between press-ons that feel like a compromise and press-ons you forget you are wearing. That is the whole secret, and it is not really a secret at all.